Monday, October 14, 2013

Let There Be (Super Pretty) Light

I need to go away more often. This weekend I joined some old friends for our annual trip to The Festy, a music festival at Devil's Backbone brewery near Charlottesville. The downside was two nights of sleeping in the rain and a second wind for the cold that's been haunting me for two weeks.

But the PLUS side was coming home to:


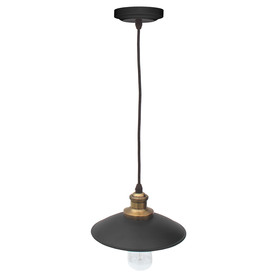
(Thanks honey!) The Harlowe Wire pendant lights I ordered from Pottery Barn are even prettier in real life! (Tip, look on Ebay for people selling Pottery Barn coupons. Worth it for bigger purchases.) These lights add just the right amount of sparkle. Now we can see Edison bulbs peaking through without being blinded by the light. Crud, now I have Manford Mann stuck in my head...and you can too:


Sorry, back on track. Glad I did a little bit of extra shopping around and decided to fudge the budget the tiniest bit. These are the first thing you see when looking at the kitchen and one of the first ones when walking in our home, and they totally dress the place up. Woo and hoo. 


Tuesday, October 8, 2013

New Life for 1920s Handles

Another piece of the kitchen puzzle. Last night, I ordered a vintage glass door knob set on Etsy, from the 1920s. With some adaptations, I plan to use a knob and back plate as the pull for the lower pantry door and just the knob on the top part.

I think the larger scale will fit well with this massive cabinet (22" x 15" and 30" deep), while still tying into the small glass knobs I'm using on most of the doors. It's so exciting waiting for the mail these days!

Glass Door Knobs and Brass Backplates

Monday, October 7, 2013

Ceiling Bling

Maybe it was the heady rush of realizing how much I'd saved on my yard sale cabinet pulls, or maybe it was the need for something SPARKLY to look at  on this dreary fall day. Oh wait--I blame my friend Liz for letting me know that Pottery Barn had 20% off their lights this week. And thus, I found myself pushing our lighting budget up by about $40 (or about $120 if you go by the price of the lights we purchased but are returning) so that we could own three of these: 


We'd gotten a great deal on some copper-look lights with Edison bulbs, at just $40 each including the bulb. And they look nice--if you don't look at them. With the exposed bulb at eye level for adults seated at the bar, the effect was a bit blinding. So the lighting search re-started.
allen + roth 9-in W Aged Brass Mini Pendant Light with Textured Shade

We looked at Ikea, back to Lowe's, Amazon, Etsy, round and round. I think the extra money we are spending on the Harlowe Wire & Glass lights is a small trade off for the time I will save by ending my internet search!

Also alleviating any budget busting guilt was finding these EXACT lights on Ebay, new in the box, for the sale price, but with no shipping or taxes. That saved over $30. Which is just enough to make me feel like I got a good deal and enjoying checking another item off the list.

Sunday, October 6, 2013

Victories of Frugality

Ah, that moment of pure joy and smug satisfaction when you realize just how good of a deal you got. In this case, while shopping for appliance pulls, I came across the style of cup pulls (who knew there were so many types of pulls!) that I'd purchased at a yard sale and will be using on our new cabinets.

It turns out they are Hickory brand "Charleston" pulls, selling from $4 to $5 each, and the knobs can be had for about $3 each. So I'm feeling pretty darn good about buying a bag of 12 pulls and 16 knobs for a grand total of...$4. Victory!

Time to go list the knobs, which we are not using, on Ebay and recoup some money towards the kitchen fund. I only need 100 more discoveries like this to offset the cost of that silly load bearing wall! Baby steps.

Friday, October 4, 2013

Knobs! Mismatched Matching

Because I planned to change blogging platforms, I've put off blogging about our Ikea kitchen remodel. Unless you count posts composed in my head. There are like 30 of those.

Anyway, as a result, I still plan to chronicle our DIY remodeling adventures, but it will now be out of order and a bit willy nilly. So, let's start near the end with cabinet hardware. I'd set a low budget ($70) for this considering that we need 12 pulls, 16 knobs and 6 appliance pulls. It meant scouring for deals and some creativity.

I'd picked up this pull and knob set for $4 at a yard sale over the summer, originally for another project, but ended up not using them. While the knobs were a little flowerly, I decided that, for my budget, I could learn to love the cup pulls. The catch was trying to find knobs that would match. Until I thought of a much better idea. NOT matching.

Especially since I was shopping on Amazon and Ebay looking for deals, it was impossible to determine if I'd end up ordering something that would prove useless. Glass became the work around. Last night I ordered 18 of the oval glass knobs pictured at right. For...drum roll...$2.35 each, on Ebay. This is a savings of several dollars per knob, compared to retail prices. With shipping + yard sale pulls, that brings me to about $53 total on cabinet hardware. And I have faith that I'll find those last few appliance pulls at a yard sale this weekend. Stranger things have happened.

At least some parts of this project are coming in under budget. Finally!


Thursday, October 3, 2013

New (Old) Stomping Grounds

I'm a bit of a blogging nomad. My first search for a blogging platform came 4 years ago as I sought a home for capturing everything that went into planning my wedding. I went through the various bridal website platforms, a few blogging sites and eventually landed here. Well, at the time, Blogspot: I Do To DIY.

Ah, those early days of domesication. Back when I heard that a marriage takes work, I thought it was meant in a 9-to-5, cushy desk job sort of way. Three years in and I'm a little wiser. Now I know it's roll up your sleeves, put on your hard hat and descend into the mine type of work. I mean, don't get me wrong. The pay is decent and the benefit package is pretty sweet, but...it's for real work.

And when the canary stops singing, it's not every man for himself, you have a family to dig out and bring back up with you. No wonder I'm exhausted all the time!

Or maybe that's because I stay up late blogging and watching HGTV. Yeah, that may have something to do with it too.

Wait. I digress. Marriage led to a new house, "our house," which led to "our" projects. Decks to build, gardens to start, furniture to find and refinish. Wanting to track the process, I wound up on Tumblr, but eventually wanted something more word friendly. A few rounds of Googling and here I am, back where I started. Thanks for having me back, Blogger!

Friday, September 6, 2013

Bullets to Bench (After)

I'm really happy with how the ammunition box upcycle went.  Here's the final product:

image

image

To get the height, we measured where other deck chairs fell and made my son pretend sit on it as we held it just to be sure (that part wasn't very scientific, but it was funny to watch).  After putting the legs on each side, we decided crossbars that connected the legs and cradled the box would add some extra support.  End result is a rustic look that I like, plus it serves double duty as storage and cost next to nothing:

  • Ammunition Box - $5 at yard sale
  • Spray Paint - $1 at ReStore (aka, best place on earth for scavengers)
  • Poly - $0 left by previous homeowner
  • Legs - $0 found wood as we cleaned the garage, prob from previous owner

So, under $10 for our new "custom" bench.  Plus, was nice bonding for the hubby & I.  The parts involving power tools were all him!  I'm the scavenger & idea person. :)  Ok, time to go test out the new bench.  Have to see if it can hold my weight along with a frosty Hoptober.  (Yikes, is it REALLY time for fall beers already???)

Sunday, September 1, 2013

Bullets to Bench (Before)

I'm really happy with how the ammunition box upcycle went.  Here's the final product:

image

image

To get the height, we measured where other deck chairs fell and made my son pretend sit on it as we held it just to be sure (that part wasn't very scientific, but it was funny to watch).  After putting the legs on each side, we decided crossbars that connected the legs and cradled the box would add some extra support.  End result is a rustic look that I like, plus it serves double duty as storage and cost next to nothing:

  • Ammunition Box - $5 at yard sale
  • Spray Paint - $1 at ReStore (aka, best place on earth for scavengers)
  • Poly - $0 left by previous homeowner
  • Legs - $0 found wood as we cleaned the garage, prob from previous owner

So, under $10 for our new "custom" bench.  Plus, was nice bonding for the hubby & I.  The parts involving power tools were all him!  I'm the scavenger & idea person. :)  Ok, time to go test out the new bench.  Have to see if it can hold my weight along with a frosty Hoptober.  (Yikes, is it REALLY time for fall beers already???)

Saturday, June 15, 2013

Antique Vanity Turned Desk

After hours of stripping oil-based paint, sanding and painting, my vanity to desk make over is near complete--just waiting for the vintage wooden casters I ordered on ebay to arrive, so I can ditch the shims under the left legs.
Before (sitting in Citri-strip at this stage):
image
After--this shot is closer to the actual color, though in real life both shades are a little more turquoisey.
image
image
I mixed the color myself, using various hues left from other projects. he drawers are what the color looked like before I added more white. My only regret was adding Zinsser primer into the paint. It caused some clumping issues that made things take longer. Live and learn.
The top is just a slab of wood from another project. Will probably paint it a creamy white down the road, but for now, it does the trick. I figure this is plenty of progress for one weekend.

Wednesday, June 12, 2013

Stripping Moms: Prepping My "New" Desk

While it may not look like it yet, I just inherited the piece of furniture that will transform my home office. For awhile now I've wanted an old desk that I could rig as a computer desk and refinish. Then, this vanity fell into my lap.

My sister-in-law held on to it for years before giving up on refinishing it. I saw its "desk potential" and happily agreed to take it off her hands. This is how it looks with gobs of Citri-Strip coated on it:

image

With a lot of elbow grease from me and my crew (aka, my mom & MIL), the ugly green crackle coat is history. Can't wait until tomorrow when I can prime it. I'm hoping to complete the whole project over the weekend and have it moved into my office by Monday morning. Too bad half of the crew heads back to NC tomorrow.

image

Monday, June 3, 2013

Dirt+Rocks+Sweat = Patio

One of my last big yard projects for the season is now off the to-do list! 30 bags of crushed gravel, 86 pavers, 12 bags + 2 wheelbarrows of rocks and a converted fire pit planter later, we now have an attractive rock garden/patio area next to the hot tub instead of a pile of muddy gook. Ok, to count the new patio area as done, I'm cheating and considering adding lattice with climbing flowers to cover up the hose & mechanical area as a separate project! So, ignoring that part...here's some after pics:

image

image

The rocks leading into the area were either painstakingly collected from around our yard (attacking ants be damned!) or were gathered during my cross country trips--aka, the pretty rocks.image

Used pea gravel in between the outer pavers and river rocks in the center. Underneath it all is crushed gravel. The center planter is an upcycled fire pit. Painted with hammered copper spray paint to pretty it up and drilled a few holes to prevent it from becoming a swampy mosquito incubator.

image

image

The wicker chair has since become a fun aubergine. Will post updated pics AFTER I get the lattice over that mess of wires and hose. As you can see, we also need a longer whip (that big, ugly gray thing smack dab in the middle of the patio) for the hot tub so we can bury the line. The contractor who moved it for us unfortunately wasn't super good at finishing up HIS to do list. But, still SO much better than where we started from, I can definitely live with this stage of progress for the time being.

We've come a long way from having one lonely hot tub platform on the hill surrounded by dirt, and it's been fun watching the backyard slowly transform into a sanctuary bit by bit. Not be cliche, but feel like we appreciate it much more since our sweat (& the occasional blood and tears) are part of each improvement. 

image

Thursday, May 30, 2013

PIP, Patio in Progress

One of these days, I'll remember to take before pictures. In this case, it would have shown an uneven pit of clay, dirt and rotting leaves languishing next to our hot tub. So picture that as the starting point. With the help of my very motivated MIL, we've taken some big steps towards my vision for that mud pit:

image

This is post raking, covering with weed barrier and filling with 30 bags (150 cubic feet) of paver base. We went extra thick with it so it could also level the ground w/o the need for digging. As you can see, there's some work to go--more pavers needed and then we'll fill in between with pea gravel. The now firepit will receive a coat of hammered copper paint and find new life as a garden/focal point. The bar at the end will remain a bar, of course. :) Here's a closer look:

image

Looking forward to wrapping this up, as it's my one big yard project for the season. Ok, that and the stone fire circle, but that's already checked off the list: 

image

It's like we get to camp in our own backyard, except instead of crawling into a tent when we leave the fire, we curl up in pillow-top, king size goodness. With no bugs. 

Friday, April 12, 2013

Hoosier Mama? New Look to Vintage Piece

Finally! The hoosier that moved into our garage, patiently waiting for a face lift, before we moved into this house, now has it's rightful place in our kitchen:

image

My baking corner! And my wine corner. Given my lack of baking affinity, it is best to keep these close together. I almost gave up on those original  handles, they were caked with decades of kitchen grease and grime. I'm so glad I decided they were worth some elbow grease and TLC. 

image

image

So, why did it take SO long to put this cabinet in its rightful place? One, the garage was a disaster zone long after we'd settled into the rest of the house. I simply couldn't get to the hoosier to start my project.

Two, it involved more than a coat of paint. Originally, the doors had a center panel that had a PA dutch style tulip stencil. But not in a good way. There was also scalloped edging under the cabinet doors, way to country kitchen for me. Here's some pics between before and after (I neglected to take pics early on):

image

image

Luckily, organizing the garage motivated my husband to bust out his tools, so he happily jigsawed off the unwanted elements of the hoosier. From there, all it needed was primer, chicken wire, custom paint (me mixing random colors in an old yogurt container), a staple gun, shelf liner...ok, a lot went into this. And we are so happy with the end result!   Extra storage, a vintage meets modern feel and a piece that we can both look at as a labor of love. It's amazing what we can accomplish in a year and a half when we work as a team. ;-)  image