Showing posts with label upcycle. Show all posts

Friday, September 6, 2013

Bullets to Bench (After)

I'm really happy with how the ammunition box upcycle went.  Here's the final product:

image

image

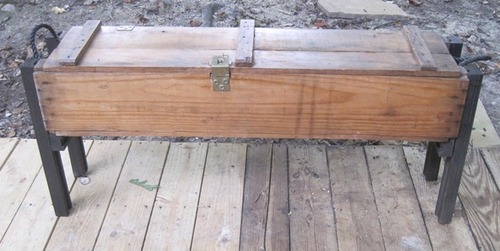
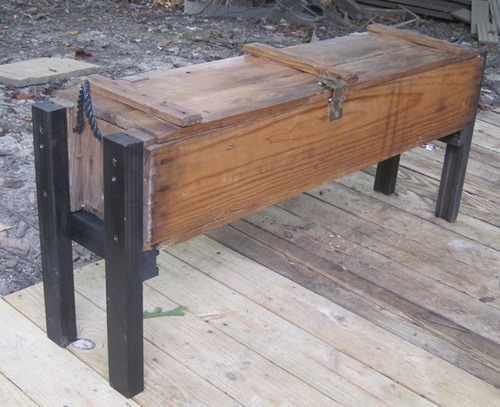
To get the height, we measured where other deck chairs fell and made my son pretend sit on it as we held it just to be sure (that part wasn't very scientific, but it was funny to watch).  After putting the legs on each side, we decided crossbars that connected the legs and cradled the box would add some extra support.  End result is a rustic look that I like, plus it serves double duty as storage and cost next to nothing:

  • Ammunition Box - $5 at yard sale
  • Spray Paint - $1 at ReStore (aka, best place on earth for scavengers)
  • Poly - $0 left by previous homeowner
  • Legs - $0 found wood as we cleaned the garage, prob from previous owner

So, under $10 for our new "custom" bench.  Plus, was nice bonding for the hubby & I.  The parts involving power tools were all him!  I'm the scavenger & idea person. :)  Ok, time to go test out the new bench.  Have to see if it can hold my weight along with a frosty Hoptober.  (Yikes, is it REALLY time for fall beers already???)

Saturday, June 15, 2013

Antique Vanity Turned Desk

After hours of stripping oil-based paint, sanding and painting, my vanity to desk make over is near complete--just waiting for the vintage wooden casters I ordered on ebay to arrive, so I can ditch the shims under the left legs.
Before (sitting in Citri-strip at this stage):
image
After--this shot is closer to the actual color, though in real life both shades are a little more turquoisey.
image
image
I mixed the color myself, using various hues left from other projects. he drawers are what the color looked like before I added more white. My only regret was adding Zinsser primer into the paint. It caused some clumping issues that made things take longer. Live and learn.
The top is just a slab of wood from another project. Will probably paint it a creamy white down the road, but for now, it does the trick. I figure this is plenty of progress for one weekend.

Wednesday, June 12, 2013

Stripping Moms: Prepping My "New" Desk

While it may not look like it yet, I just inherited the piece of furniture that will transform my home office. For awhile now I've wanted an old desk that I could rig as a computer desk and refinish. Then, this vanity fell into my lap.

My sister-in-law held on to it for years before giving up on refinishing it. I saw its "desk potential" and happily agreed to take it off her hands. This is how it looks with gobs of Citri-Strip coated on it:

image

With a lot of elbow grease from me and my crew (aka, my mom & MIL), the ugly green crackle coat is history. Can't wait until tomorrow when I can prime it. I'm hoping to complete the whole project over the weekend and have it moved into my office by Monday morning. Too bad half of the crew heads back to NC tomorrow.

image

Friday, April 12, 2013

Hoosier Mama? New Look to Vintage Piece

Finally! The hoosier that moved into our garage, patiently waiting for a face lift, before we moved into this house, now has it's rightful place in our kitchen:

image

My baking corner! And my wine corner. Given my lack of baking affinity, it is best to keep these close together. I almost gave up on those original  handles, they were caked with decades of kitchen grease and grime. I'm so glad I decided they were worth some elbow grease and TLC. 

image

image

So, why did it take SO long to put this cabinet in its rightful place? One, the garage was a disaster zone long after we'd settled into the rest of the house. I simply couldn't get to the hoosier to start my project.

Two, it involved more than a coat of paint. Originally, the doors had a center panel that had a PA dutch style tulip stencil. But not in a good way. There was also scalloped edging under the cabinet doors, way to country kitchen for me. Here's some pics between before and after (I neglected to take pics early on):

image

image

Luckily, organizing the garage motivated my husband to bust out his tools, so he happily jigsawed off the unwanted elements of the hoosier. From there, all it needed was primer, chicken wire, custom paint (me mixing random colors in an old yogurt container), a staple gun, shelf liner...ok, a lot went into this. And we are so happy with the end result!   Extra storage, a vintage meets modern feel and a piece that we can both look at as a labor of love. It's amazing what we can accomplish in a year and a half when we work as a team. ;-)  image